Use Let’s Encrypt to add an SSL certificate to your Dreamhost-hosted site
Update 2/2016: You don’t need to follow any of the instructions in this post any more! You can just enable a Let’s Encrypt certificate in the Dreamhost panel! But if you want to generate your own Let’s Encrypt certificate locally and add it to your site, keep reading, original post follows …
EFF’s Let’s Encrypt initiative just made getting a free, CA-signed server certificate easier than it’s ever been before. Running a single command generates everything you need, obtains the public cert and even installs it into your webserver of choice. So let’s encrypt, and move the web closer to HTTPS everywhere!
Here’s a quick tutorial for using Let’s Encrypt with Dreamhost’s shared hosting. It’s not quite automatic, since you’ll have to copy-paste 3 things into boxes via the Dreamhost web panel, but it’s a lot simpler than the alternatives. As someone who’s done this the old way countless times, Let’s Encrypt was shockingly easy!
First, let me start by saying I ran all this locally on my laptop running Fedora — if you’re stuck on Windows or OS X without a friendly package manager, I can’t help you install Let’s Encrypt, but there are instructions on the site. It’s CLI-only, so you can also easily run Let’s Encrypt in an SSH session on a remote Linux machine or local virtual machine.
On Linux, here’s all I did to install Let’s Encrypt, run it, and paste the generated server certificate chain and private key into the Dreamhost web panel.
Instructions
First, download Let’s Encrypt and run letsencrypt-auto --help once to install any missing dependencies.
git clone https://github.com/letsencrypt/letsencrypt.git
cd letsencrypt
./letsencrypt-auto --help
Next, you’ll run letsencrypt-auto in manual mode to create (but not install) the generated certificates. In this example I’ll just create one certificate, for “example.com”, but you can add more than one -d parameter to generate as many certificates at once as you like.
./letsencrypt-auto certonly --manual -d example.com
The first time you run the Let’s Encrypt interactive client, it will ask you for an email address and to agree to the Terms of Service — you’ll want to give a good email address, since it’ll be used for emergency key recovery, but the email address you use doesn’t have to have anything to do with the domain name you’re certifying.
Next, the client will display a message that starts like this:
Make sure your web server displays the following content at
http://example.com/.well-known/acme-challenge/RcapSBi_ZOlYnrByap1cRRrHln1lzKOIXwg2NowrZt5 before continuing:

RcapSBi_ZOlYnrByap1cRRrHln1lzKOIXwg2NowrZt5.lvgVdH1KypqK217AlBi9qE6ZYiusmdqZrzYNqOMGp3o

...
Press ENTER to continue
So, before you press Enter, you need to create that file at that URL on your site, so that Let’s Encrypt can validate that you actually control the domain. You can do this by creating the file locally and uploading it via SFTP or SCP, or you can SSH to your hosting account and just create it there. For example, I did:
ssh example.com
cd example.com/htdocs
mkdir -p .well-known/acme-challenge
echo "RcapSBi_ZOlYnrByap1cRRrHln1lzKOIXwg2NowrZt5.lvgVdH1KypqK217AlBi9qE6ZYiusmdqZrzYNqOMGp3o" > .well-known/acme-challenge/RcapSBi_ZOlYnrByap1cRRrHln1lzKOIXwg2NowrZt5
Before continuing, check that the challenge URL now loads correctly through your browser, and press Enter. Let’s Encrypt will exit, it’s already done!
IMPORTANT NOTES:
 - If you lose your account credentials, you can recover through
   e-mails sent to youremail@example.com.
 - Congratulations! Your certificate and chain have been saved at
   /etc/letsencrypt/live/example.com/fullchain.pem. Your cert will
   expire on 2016-03-03. To obtain a new version of the certificate in
   the future, simply run Let's Encrypt again.
 - Your account credentials have been saved in your Let's Encrypt
   configuration directory at /etc/letsencrypt. You should make a
   secure backup of this folder now. This configuration directory will
   also contain certificates and private keys obtained by Let's
   Encrypt so making regular backups of this folder is ideal.
 - If like Let's Encrypt, please consider supporting our work by:

   Donating to ISRG / Let's Encrypt:   https://letsencrypt.org/donate
   Donating to EFF:                    https://eff.org/donate-le
So now, you just need to log into the Dreamhost panel to install the certificate. Under “Domains” go to “Secure Hosting” and click the “Add Secure Hosting” button. Select the domain name (“example.com”) you’d like to host securely. (You don’t need to add a unique IP.)
Dreamhost will give you a success message saying that it’s started secure hosting using a self-signed certificate. So, the final step is to replace that cert with the one you generated using Let’s Encrypt.
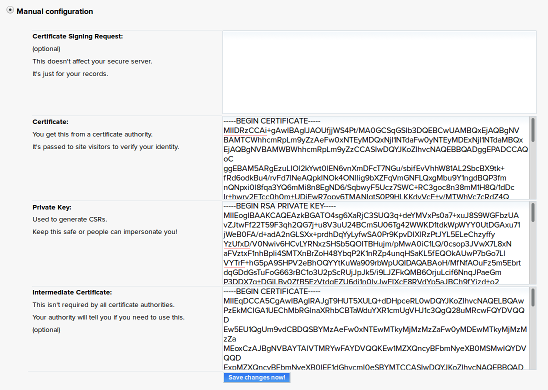
Click the Edit button next to your domain and then choose “Manual configuration.” You’ll now see 4 boxes that you need to update:
- Certificate Signing Request
- Delete everything in this box and leave it blank.
- Certificate
- This is the certificate that Let’s encrypt has installed into
/etc/letsencrypt/live/example.com/cert.pem— paste the contents of that file into this box. - Private Key
- Let’s Encrypt uses a newer format than Dreamhost expects. So for this one, run the
opensslcommandopenssl rsa -in /etc/letsencrypt/live/example.com/privkey.pemto dump the RSA PRIVATE KEY to screen, and paste the results into this box. - Intermediate Certificate
- This is the certificate that Let’s encrypt has installed into
/etc/letsencrypt/live/example.com/chain.pem— paste the contents of that file into this box.
When you’re done, it should look something like this:
Click “Save changes now!” and you’re done!
What about total automation?
You may already know that Dreamhost has its own API that you can use to control certain functions of your hosting account, so wouldn’t it be great if there were a Dreamhost module for Let’s Encrypt that completely automated this whole process?
Then you could just run Let’s Encrypt in a cronjob once every three months, and be done with this certificate nonsense forever!
Unfortunately, at present the API doesn’t include methods for modifying the SSL certificate configuration, so it’s just a pipedream for now. But if that’s something you’d like, tell Dreamhost, and maybe they’ll make it happen.
